Template Detailing Tools
| Summarize Disabled Member Templates | Summarize Disabled Submaterial Templates |
| Summarize Disabled Member Rules | Summarize Disabled Submaterial Rules |
| Summarize Active Member Rules | Summarize Active Submaterial Rules |
| Edit Creating Rule ( |
Disable Creating Rule ( |
| Disable Creating Template |
- The Current Template toolbar item (classic) shows the name of the currently loaded template. An equivalent item is shown on the ribbon (lightning) for the ' Template Developer ' role.
|
|
|
Current Template |
Also see :
- List Setup Attributes (for writing rules keyed to setup choices)
- List Drawing Overrides (for managing setup overrides)
- List All Overrides (for managing setup overrides)
- detail_lib.py (contains useful functions for defining rules)
- Copy Detailing Templates (utility for copying templates from one Job to another)
page 1 | contents | process > template detailing tools (drawing editor) | top
Template Properties opens the Detailing Template Manager , which lets you edit the properties of a detailing template. Template properties are used by automatic detailing with templates to pick from the folders storing templates those templates that are candidates to be used for detailing a member or for detailing a submaterial. Conditions can be set to apply templates for specific member or material types.
|
Before using this tool, you must be in a drawing in the Drawing Editor . It is generally a good idea to open ( Ctrl + o ) a drawing that was generated by automatic detailing using templates , although doing so is not required. You can review or edit Template Properties regardless of your current drawing's type.
1 . In the Drawing Editor , invoke Template Properties using any one of the following methods:
Template
Propertiesopens the Detailing Template Manager
Method 1 : Choose Process > detailing Template Tools > Template Properties .
Method 2 : On your toolbar, click the icon pictured above. If the icon is not on your toolbar, you can add it using Toolbar Configuration .
Method 3 : Use a keyboard shortcut. To set up a keyboard shortcut, choose Options > Keyboard Shortcut Editor .
2 . The Detailing Template Manager opens. On it will be listed all of the templates that are in the
fabs/default_templates folder in your current Job .
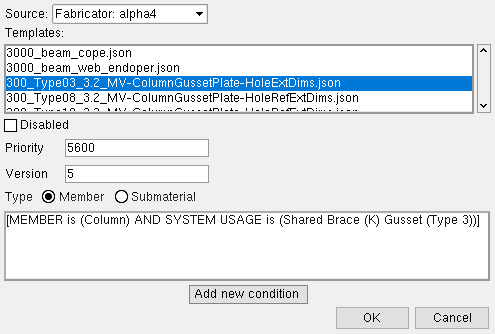
The template that is selected in this example will be applied to column member details only when the column supports a system-designed gusset that is connected to by vertical braces. 2a : As stated above, when this window first opens, it lists all of the templates that are in the
fabs/default_templates folder in your current Job . You can, if you so choose, change the " Source " from ' Default ' to a Fabricator in your current Job and thereby switch to a different set of templates.
2b : Select the template you want to review or change the properties of. All templates in the selected " Source " will be listed.
2c : You may choose to "
Disable " a template if you want to prevent it from being applied during automatic detailing with templates. The " Priority " number sets the order in which templates are applied. The " Version " number is used for tracking changes to templates. The " Type " sets whether a template is applied during Detail Members or Detail Submaterial .
2d : Additional conditions may be added by pressing the " Add new condition " button then writing a Python statement. When the statement is true, rules in the template may potentially be applied. For example, the statement [MEMBER is (Column)] is true when you are attempting to Detail Members and you have selected a column to be detailed and you have checked the box for " Detail using templates ."
2e : Repeat steps 2a, 2b and 2c to review and/or make changes to additional templates. Pressing " OK " will save any changes that you have made to templates and close the Detailing Template Manager . Pressing " Cancel " closes the Detailing Template Manager without saving changes that you have made.
Also see: To output a report on template properties, see List Template Properties .
page 1 | contents | process > template detailing tools (drawing editor) | top
Apply Templates automatically unshortens your current drawing and details that drawing based on the rules contained in the one template that you select. Your current drawing should be a member detail or submaterial . If it is another type of drawing, no dimensions or annotations will be applied.
Before using this tool, you may want to Delete All But Polygons in order to clear dimensions and annotations from your current drawing so that you can better see the results of applying a template.
1 . In the Drawing Editor , invoke Apply Templates using any one of the following methods:
Apply
Templatespartially details your current drawing
Method 1 : Choose Process > detailing Template Tools > Apply Template s.
Method 2 : On your toolbar, click the icon pictured above. If the icon is not on your toolbar, you can add it using Toolbar Configuration .
Method 3 : Use a keyboard shortcut .
2 . A selection dialog opens with a list of all detailing templates. Select the one or more templates that you want to apply, then press the " Open " button.
3 . It your current drawing has named points that are identified by rules in the template you selected in step 2, those rules will be applied to the named points, resulting in the addition of dimensions and/or annotations to your drawing.
page 1 | contents | process > template detailing tools (drawing editor) | top
This tool is an alternative to using Display Rules then pressing " Add new " to create a new rule. You might also find it useful as a self-training tool. To define a rule, you set locations and specify a drawing item such as a dimension or label.
Your current drawing must be a member detail or submaterial . It does not matter if the drawing was generated using templates. As long as the drawing was system generated (auto detailed), rules can be written using this tool.
To Convert to Rule in a previously saved template, you need to first Load Template so that it becomes your Current Template .
Convert to Rule for a new, blank template: To create a new, blank template, you can first Save Template As then Load Template . Or you can invoke Display Rules without having first used Load Template , then use Save Template As to save the template and give it a file name. You can add information to a blank template by pressing the " Add new " button and creating a new rule (see step 2).
1 . In the Drawing Editor , invoke Convert to Rule using any one of the following methods:
|
|
Method 1 : Choose Process > detailing Template Tools > Convert to Rule .
Method 2 : On your toolbar, click the icon pictured above. If the icon is not on your toolbar, you can add it using Toolbar Configuration .
Method 3 : Use a keyboard shortcut .
2 . The status line will prompt you to " Locate items to make into a complex rule ." Select or Select + (or draw an area box ) to select dimensions or labels.
3 . One of the following will happen:
Possibility 1 : If you selected an item that Convert to Rule has not been programmed to create a rule for, the Detailing Rules window opens. Go to step 4.
Possibility 2 : If you selected an item that Convert to Rule recognizes it can help you create a rule for, the Create Rule window will open. Read the instructions carefully, select the choice you want, then press " Next " to go to the next screen and do the same. When you have filled out the final screen, pressing " Next " takes you to step 4.
Possibility 3 : If you selected items for which you have already done a Convert to Rule, nothing will happen. You are done. Do not continue.
4 . The Detailing Rules window opens. See Display Rules for more information. Double-click the new rule you have created to open the Edit Detailing Rule window so that you can review it and, if needed, revise it further.
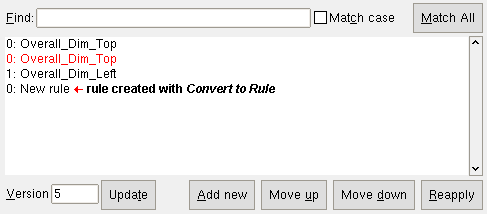
The Detailing Rules window lets you review the rules in your Current Template , rearrange those rules (" Move up " or " Move down "), create new rules (" Add new ") and save any changes you have made to the template (" Update "). Double-clicking a rule opens the Edit Detailing Rule window. Select a rule and press the Delete key to remove the rule.
page 1 | contents | process > template detailing tools (drawing editor) | top
Creating Rule reports the template and rule that created a specific dimension or label. The following instructions explain how to invoke Creating Rule then select an item. Be aware that you can, instead, preselect an item then run Creating Rule .
|
|
Before beginning, you need to open a drawing (member detail or submaterial) that was generated by automatic detailing using templates .
1 . In the Drawing Editor , invoke Creating Rule using any one of the following methods:
Creating
Rulegets template name & rule
Method 1 : Choose Process > detailing Template Tools > Creating Rule .
Method 2 : On your toolbar, click the icon pictured above. If the icon is not on your toolbar, you can add it using Toolbar Configuration .
Method 3 : Use a keyboard shortcut .
2 . The status line will prompt you to " Locate item for which to print source ." Left-click ( Select ) one dimension or one label.
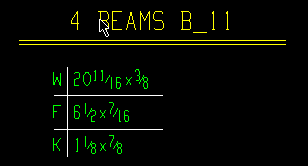
In this example, the member callout is selected. Be aware that if you click an item that was not generated from a template (e.g., a polygon), the window will not report any information in step 3. 3 . Creating Rule will report the name of the template and rule that generated the dimension or label that you selected in step 3. You can optionally print the information (" Print ") or save it to a file (" Save ") or copy it (" Copy All "). Press the " OK " button to close the window.

This example shows the template and rule used to generate the beam callout that was clicked in step 2. To find out more information about this rule, the user could use Load Template and select the template named 9000_memb_callout_main. Tip: If the Detailing Rules window is open (displaying the rules contained in your Current Template ), then invoking Creating Rule and selecting an item that was created by that template will automatically highlight, in the Detailing Rules window, the rule that created the selected item.
page 1 | contents | process > template detailing tools (drawing editor) | top
Delete All But Polygons deletes everything from the drawing except the polygons. That is to say, it removed dimensions, annotations, construction lines and snaplines from the drawing. This is useful if you are doing an Apply Templates or before you press " Reapply " on the Detailing Rules window or when you press " Apply " or " Apply & OK " on the Edit Detailing Rule window.
Before beginning, you should open a member detail or submaterial. While Delete All But Polygons can be performed on any type of drawings, it is most useful on drawings that are capable of having dimensions or annotations regenerated using rules on templates.
1 . In the Drawing Editor , invoke Delete All But Polygons using any one of the following methods:
Delete All
But Polysremoves dimensions, etc.
Method 1 : Choose Process > detailing Template Tools > Delete All But Polygons .
Method 2 : On your toolbar, click the icon pictured above. If the icon is not on your toolbar, you can add it using Toolbar Configuration .
Method 3 : Use a keyboard shortcut .
2 . All dimensions, annotations, construction lines and snaplines are removed from the drawing. Material polygons remain.
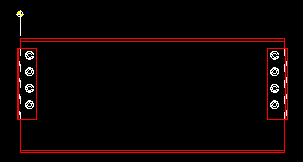
The main view on a beam detail after Delete All But Polygons has removed all of the drawing's dimensions and annotations.
page 1 | contents | process > template detailing tools (drawing editor) | top
Delete All Snaplines deletes all snaplines from the drawing. This is useful, for example, if you have generated snaplines using Apply Templates and now want to remove them. Snaplines are construction lines laid out in a grid pattern for the purpose of dimensioning and annotation placement during automatic detailing using templates .
1 . In the Drawing Editor , invoke Delete All Snap Lines using any one of the following methods:
Delete All
SnapLinesremoves snaplines
Method 1 : Choose Process > detailing Template Tools > Delete All Snaplines .
Method 2 : On your toolbar, click the icon pictured above. If the icon is not on your toolbar, you can add it using Toolbar Configuration .
Method 3 : Use a keyboard shortcut .
2 . All snaplines are removed from the drawing, reducing clutter.
page 1 | contents | process > template detailing tools (drawing editor) | top
Display Rules displays the list of detailing rules in your current template . You can rearrange those rules, edit a rule (double-click the rule), create new rules (" Add new ") or save any changes you have made to the template (" Update ").
To Display Rules in an existing template, you need to first Load Template so that it becomes your Current Template .
Display Rules for a new, blank template: To create a new, blank template, you can first Save Template As then Load Template . Or you can invoke Display Rules without having first used Load Template , then use Save Template As to save the template and give it a file name. You can add information to a blank template by pressing the " Add new " button and creating a new rule (see step 2).
1 . In the Drawing Editor , invoke Display Rules using any one of the following methods:
Display
Rulesopens the Detailing Rules window
Method 1 : Choose Process > detailing Template Tools > Display Rules .
Method 2 : On your toolbar, click the icon pictured above. If the icon is not on your toolbar, you can add it using Toolbar Configuration .
Method 3 : Use a keyboard shortcut .
2 . The Detailing Rules window opens. The window lets you review the rules in your Current Template , rearrange those rules, create new rules, or save any changes you have made to the template.
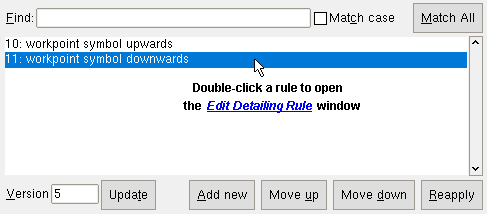
Double-click a rule to open the Edit Detailing Rule window.
Select a rule, then press the Delete key to delete that rule. Or you can right-click and choose " Delete " on the context menu.
" Add new " lets you create a new rule so that you can, for example, add a dimension, label, pointer or etc. to a detail. As does double-clicking a rule that has already been created, pressing " Add new " opens the Edit Detailing Rule window.
" Move up " or " Move down " rearranges the rules in the list.
" Reapply " recreates the annotation or dimension prescribed by the rule. You may want to first use Delete All But Polygons .
" Update " saves the file as your Current Template , overwriting the existing template of the same name.
Press the close button (
) to close the window when you are done. If you have not used " Update " already, you will need to Save Template in order to actually modify the current template file. Or, instead of modifying your current template, you can use Save Template As to save your changes to a new template file.
page 1 | contents | process > template detailing tools (drawing editor) | top
Find Matching Rules finds the rules in available templates that would create a given drawing item.
Your current drawing must be a member detail or submaterial . It does not matter if the drawing was generated using templates. As long as the drawing was system generated (auto detailed), it will have drawing annotations or dimensions for which you can find the matching rules.
Tip: If your drawing was generated by automatic detailing using templates , you may prefer to use the Creating Rule tool instead of this tool. The Creating Rule tool works much faster.
1 . Invoke Find Matching Rules using any one of the following methods:
Find
Rulesoutputs a report
Method 1 : Choose Process > detailing Template Tools > Find Matching Rules .
Method 2 : On your toolbar, click the icon pictured above. If the icon is not on your toolbar, you can add it using Toolbar Configuration .
Method 3 : Use a keyboard shortcut .
page 1 | contents | process > template detailing tools (drawing editor) | top
Find Property finds named locations having a property or a property and value.
Your current drawing must be a member detail or submaterial . If the drawing was auto detailed using templates, it will have named locations. Drawings that were auto detailed without templates may also have named locations that can be discovered using this tool. Member details that are detailed without templates will have named locations if "
Generate named locations " was turned on (checked) when they were auto detailed.
1 . In the Drawing Editor , invoke Find Property using any one of the following methods:
|
|
Method 1 : Choose Process > detailing Template Tools > Find Property .
Method 2 : On your toolbar, click the icon pictured above. If the icon is not on your toolbar, you can add it using Toolbar Configuration .
Method 3 : Use a keyboard shortcut .
2 . The Name and Value window opens. To " Name " enter the property you are looking for. You can optionally enter a " Value " of that property to narrow down your search. Press " OK " to continue to step 3.

If the " Value " was left blank in this example, the search would find named locations on both the left and right ends instead of just the right end. 3 . Find Property marks with an X each named location with a property and value that matches the " Name " and " Value " you entered in the previous step. Move your mouse pointer (
) so that its tip is directly over the center of the X that you want, then left-click ( Locate ).
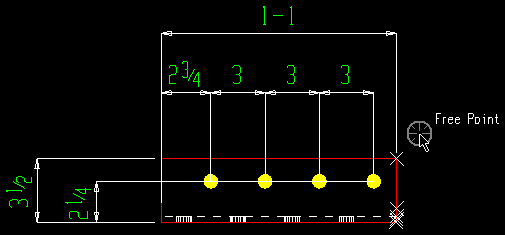
In this example, each X is along the right end of the material because the " Name " entered was End and the " Value " entered was Right. You need to click close to the exact center of an X 4 . The named location markers (X's) will remain on screen. A window with a table will open. The table shows the properties and values of the named location. Press the " OK " button on the bottom of the window to close it when you are done reviewing its contents.
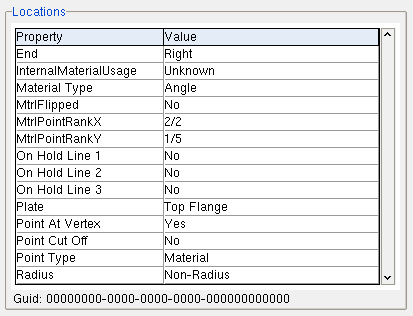
This location is exactly the same one that was clicked in the example for Show Nearest Names . 5 . The named location markers (X's) remain on screen.
Alternative 1 : Repeat steps 3 and 4 at other named locations to find out additional information.
Alternative 2 : Click a blank space to end the Find Property procedure.
page 1 | contents | process > template detailing tools (drawing editor) | top
Nearest Names shows all named locations , then lets you click an X to identity that X's named location.
|
Your current drawing must be a member detail or submaterial . If the drawing was auto detailed using templates, it will have named locations. Drawings that were auto detailed without templates may also have named locations that can be discovered using this tool. Member details that are detailed without templates will have named locations if "
Generate named locations " was turned on (checked) when they were auto detailed.
1 . In the Drawing Editor , invoke Nearest Names using any one of the following methods:
|
|
Method 1 : Choose Process > detailing Template Tools > Nearest Names .
Method 2 : On your toolbar, click the icon pictured above. If the icon is not on your toolbar, you can add it using Toolbar Configuration .
Method 3 : Use a keyboard shortcut .
2 . Each named location in your current drawing will be marked with an X as shown below. Move your mouse pointer (
) so that its tip is directly over the center of the X that you want, then left-click ( Locate ).
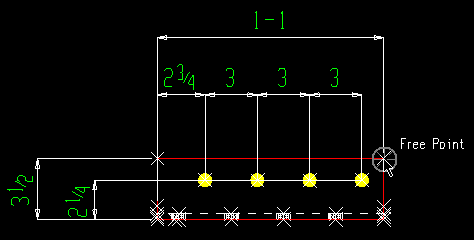
You may have to zoom in close to the center of an X in order get information about that location. If you click too far away from an X, every X will disappear, and you won't get any information. 3 . The named location markers (X's) will disappear, and a window with a table will open. The table shows the properties and values of the named location. Press the " OK " button on the bottom of the window to close it when you are done reviewing its contents.

This location does not have a guid. If the location was, for example, a hole, it would have a guid.
page 1 | contents | process > template detailing tools (drawing editor) | top
Load Template opens a detailing template, making it your current template . The templante can be from the ' Default ' templates folder or to any Fabricator with a templates folder that is in your current Job. When a detailing template is your current template, you can use detailing template tools such as Display Rules or Convert to Rule or Save Template or Save Template As .
|
|
It is generally a good idea to load a template that is for a drawing type that matches the drawing type of your current drawing. For example, if you want to load a detailing template for a vertical brace, your current drawing should be, but is not required to be, a vertical brace.
1 . In the Drawing Editor , invoke Load Template using any one of the following methods:
Load
Templateopens a template file
Method 1 : Choose Process > detailing Template Tools > Load Template .
Method 2 : On your toolbar, click the icon pictured above. If the icon is not on your toolbar, you can add it using Toolbar Configuration .
Method 3 : Use a keyboard shortcut .
2 . A selection dialog opens with a list of all detailing templates that are maintained the selected " Source ." The " Source " can be set to the ' Default ' templates folder or to any Fabricator with a templates folder that is in your current Job. Select the one (1) template you want to load and press the " OK " button.
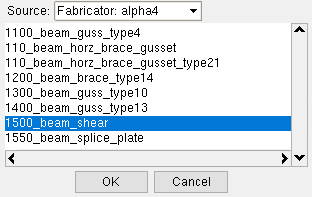
In this example, the templates folder for the Fabricator named alpha4 is selected as the " Source ." See the information for template developers at the top of this page for more on managing template folders. 3 . The template is now open and can be written to. If the Current Template toolbar item has been placed on your toolbar, it will show the name of the template. The Detailing Rules window will open. On it will be listed the rules that are associated with the newly loaded template. See Display Rules for more information.

The Current Template toolbar item shows the name of the currently loaded template.

The Detailing Rules window lets you review the rules in your Current Template , rearrange those rules (" Move up " or " Move down "), create new rules (" Add new ") and save any changes you have made to the template (" Update "). Double-clicking a rule opens the Edit Detailing Rule window. Select a rule and press the Delete key to remove the rule.
page 1 | contents | process > template detailing tools (drawing editor) | top
Save Template saves the current template , overwriting the old file with any rule changes that you have made. The folder that the template is saved into is the " Source " that you selected when you did a Load Template to open that template file.
1 . In the Drawing Editor , invoke Save Template using any one of the following methods:
Save
Templateupdates the current file
Method 1 : Choose Process > detailing Template Tools > Save Template .
Method 2 : On your toolbar, click the icon pictured above. If the icon is not on your toolbar, you can add it using Toolbar Configuration .
Method 3 : Use a keyboard shortcut .
2 . Any changes that you made to your current template will be saved. That template continues to be your current template, and you may make additional changes to it if you so choose.
If you do not have a current template, then Save Template will do nothing. No detailing template file will be saved.
page 1 | contents | process > template detailing tools (drawing editor) | top
Save Template As saves the current template as a template file, prompting for a file name. If you do not have a current template , then Save Template As will create a blank template, which you can later open. To open a template file created using Save Template As , use Load Template .
1 . In the Drawing Editor , invoke Save Template As using any one of the following methods:
|
|
Method 1 : Choose Process > detailing Template Tools > Save Template As .
Method 2 : On your toolbar, click the icon pictured above. If the icon is not on your toolbar, you can add it using Toolbar Configuration .
Method 3 : Use a keyboard shortcut .
2 . A selection dialog opens with a list of all detailing templates that are maintained in the templates folder for the selected " Source ." You can select as your " Source " the " Default " templates folder or any Fabricator with a templates folder that is in your current Job. Select the " Source " where you want your current template to be copied to, then enter a " Template name " and press the " OK " button.
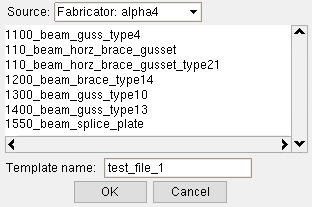
In this example, the templates folder for the Fabricator named alpha4 is selected as the " Source ." That Fabricator was created specifically for template development. See the information for template developers at the top of this page. 3 . A new template file with the name that you entered to " Template name " will be written to the folder for the " Source " you selected in step 2. The current template that was current before step 1 will continue to be the current template. To open the new template you just created using this procedure, you can use Load Template .
Save Template As to modify a template: After having used Load Template , invoke Display Rules and make changes to the rules associated with that template. For example, modify a rule or delete a rule or add a new rule. Press the close button (
) to close the Detailing Rules window, then Save Template As to save your changes to a new template. Another tool that you can use with Save Template As to modify a template is Convert to Rule .
page 1 | contents | process > template detailing tools (drawing editor) | top
Copy Templates can be used to copy templates from one " Source " to another. Each " Source " that you can select corresponds to a templates folder in your current Job . For example, you can Copy Templates that you have developed for a Fabricator named "alpha4" to the " Default " folder, which is the fabs/default_templates folder in your current Job.
To copy templates from one Job to another, you can use the Copy Detailing Templates utility.
Before using this tool, you must be in a drawing in the Drawing Editor . The drawing type does not matter.
1 . Invoke Copy Template using any one of the following methods:
Copy
Templatecopies within current Job
Method 1 : Choose Process > detailing Template Tools > Copy Template .
Method 2 : On your toolbar, click the icon pictured above. If the icon is not on your toolbar, you can add it using Toolbar Configuration .
Method 3 : Use a keyboard shortcut .
2 . A selection dialog opens with a list of all detailing templates that are maintained in the templates folder for " Copy from ."
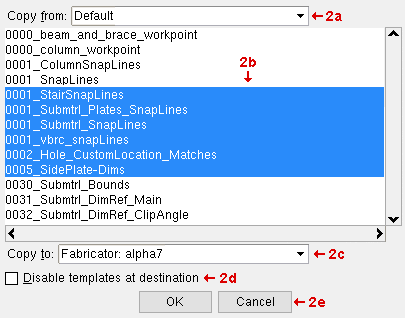
2a : For " Copy from " select ' Default ' or a ' Fabricator: xxx '. The ' Default ' folder is the
fabs/default_templates folder in your current Job . Each ' Fabricator: xxx ' represents a set of templates for a Fabricator that is stored in your current Job. When you make a different selection to " Copy from ," the list of templates is reloaded with the names of templates that are stored in the respective source.
2b : Select the templates that you want to copy into the " Copy to " folder.
2c : For " Copy to " select ' Default ' or a ' Fabricator: xxx '. Each of these choices represents a different templates folder as described in step 2a.
2d : The " Disable templates at destination " option, when checked (
), causes all copies of the templates to be set to " Disabled ." If " Disable templates at destination " is not checked (
), the templates that are copied the " Copy to " folder will be exact copies of the original templates that they are copies of.
2e : Press " OK " to copy the templates selected in step 2b from the " Copy from " folder to the " Copy to " folder.
After you are done with this operation, you can confirm that the templates you selected to be copied are in the " Copy to " folder by using the Template Properties tool.
page 1 | contents | process > template detailing tools (drawing editor) | top
List Rule Settings outputs a report listing the " General Property " rule settings for all detailing templates available to be used in your current Job . These templates are stored in the ![]() fabs/default_templates folder and in control files associated with Fabricators in your current Job.
fabs/default_templates folder and in control files associated with Fabricators in your current Job.
Example rule settings output:
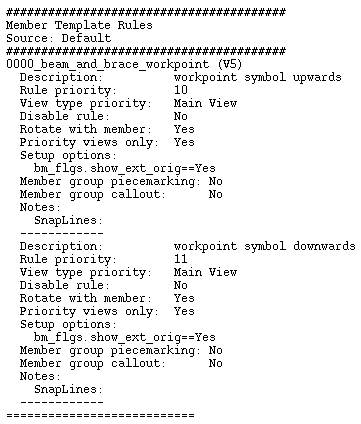
For a particular template (e.g., 0000_beam_and_brace_workpoint (v5) ) and a particular rule on that template (e.g., workpoint symbol upwards ), settings on this report match General Properties settings on the Edit Detailing Rule window.

The report is divided into sections. The example above shows the " Member Template Rules " section for the " Default " templates. The " Default " templates are stored in the fabs/default_templates folder. The " Source " might also be a Fabricator name.
To use List Rule Settings , you must be in a drawing in the Drawing Editor . The type of drawing does not matter.
1 . In the Drawing Editor , invoke List Rule Settings using any one of the following methods:
List Rule
Settingsoutputs a report
Method 1 : Choose Process > detailing Template Tools > List Rule Settings .
Method 2 : On your toolbar, click the icon pictured above. If the icon is not on your toolbar, you can add it using Toolbar Configuration .
Method 3 : Use a keyboard shortcut .
2 . The Output Configuration window opens, allowing you to change where you " Send output to " (for example, to " File " or " Screen/report viewer " or " Printer ").
Alternative 1 : Press the " OK " button to output the report. Go to step 4.
Alternative 2 : Press " Cancel " to end this operation without generating the report. Do not continue.
3 . The Rule Settings List is output to the device/ location that you designated.
Note: If you output the report to the report viewer (" Screen/report viewer "), you can now review the report on screen, then optionally print it or output it to disk.
page 1 | contents | process > template detailing tools (drawing editor) | top
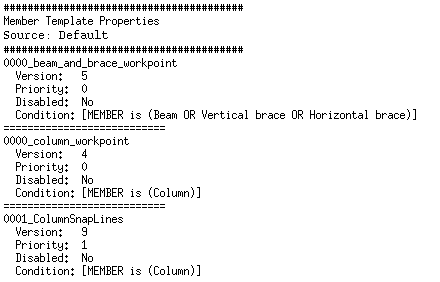
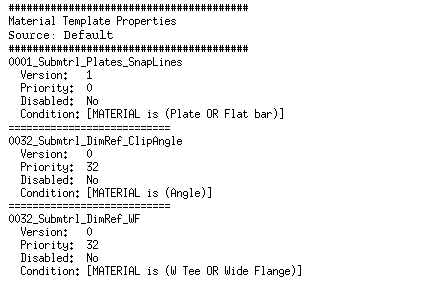
List Template Properties lists all detailing template properties that are maintained as automatic detailing templates in your current Job . The report is divided into sections for each " Source ." Each " Source " section is divided into sections for submaterial properties and member properties. When the " Source " is ' Default ', the templates referenced in that section of the report are those templates that are stored in the ![]() fabs/default_templates folder. The " Source " might also be a Fabricator name. If, while looking through the report, you discover that changes need to be made to a property, you can use Template Properties to make those changes.
fabs/default_templates folder. The " Source " might also be a Fabricator name. If, while looking through the report, you discover that changes need to be made to a property, you can use Template Properties to make those changes.
Example output of member template properties:
Example output of material template properties:
To use List Template Properties , you must be in a drawing in the Drawing Editor . The type of drawing does not matter.
1 . In the Drawing Editor , invoke List Template Properties using any one of the following methods:
List Tplt
Propsoutputs a report
2 . The Output Configuration window opens, allowing you to change where you " Send output to " (for example, to " File " or " Screen/report viewer " or " Printer ").
Alternative 1 : Press the " OK " button to output the report. Go to step 4.
Alternative 2 : Press " Cancel " to end this operation without generating the report. Do not continue.
3 . The Templates Properties List is output to the device/ location that you designated.
Note: If you output the report to the report viewer (" Screen/report viewer "), you can now review the report on screen, then optionally print it or output it to disk (see Output-Request Summary ). Page 1 reports member template properties. Page 2 reports material detail properties.
page 1 | contents | process > template detailing tools (drawing editor) | top
Mark Named Locations marks each named location on your current member detail or submaterial with an X. To shut off the display of the marks, use Unmark Named Locations .
Your current drawing must be a member detail or submaterial . If the drawing was auto detailed using templates, it will have named locations. Drawings that were auto detailed without templates may also have named locations that can be discovered using this tool. Member details that are detailed without templates will have named locations if "
Generate named locations " was turned on (checked) when they were auto detailed.
1 . In the Drawing Editor , invoke Mark Locations using any one of the following methods:
Mark
Locsdisplays named locations
Method 1 : Choose Process > detailing Template Tools > Mark Locations .
Method 2 : On your toolbar, click the icon pictured above. If the icon is not on your toolbar, you can add it using Toolbar Configuration .
Method 3 : Use a keyboard shortcut .
2 . Each named location in your current drawing will be marked with an X. To shut off the display of the marks, use Unmark Named Locations .
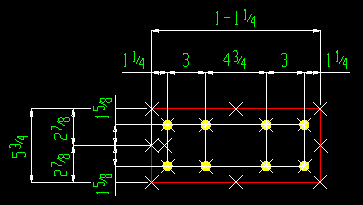
Named locations are capable of being dimensioned to or annotated using rules in templates. Also see: Nearest Names also shows named locations, plus gives you additional information when you click one of those locations.
page 1 | contents | process > template detailing tools (drawing editor) | top
Unmark Named Locations unmarks all named locations that were marked (each location with an X) using Mark Named Locations .
Before using Unmark Named Locations :

These named locations were each marked with an X using Mark Named Locations . To invoke Unmark Named Locations , click the icon:
Unmark
Locshides named locations
After using Unmark Named Locations :
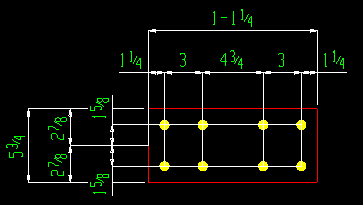
Named locations are no longer marked. The X's disappear.
page 1 | contents | process > template detailing tools (drawing editor) | top
Copy Named Locations copies the named locations from another drawing to the current drawing.
page 1 | contents | process > template detailing tools (drawing editor) | top
Print Member Item Counts prints the counts of drawing items in the details of all members that have been automatically detailed, regardless of whether or not they were detailed using templates. Counts will also be reported for user-created details. Dimensions, labels, bevel symbols, pointers, weld symbols and hole symbols will be counted. The count will include user-added drawing items (dimensions, labels, etc.) as well as system-generated drawing items.
To use this tool, you must be in a drawing in the Drawing Editor . The type of drawing does not matter.
A possible application: Template developers might generate a report that includes details generated without using templates and compare it to another report on the same job, after having re-detailed that job using templates. The two reports could then be compared in order to quickly evaluate which details are clearly different.
Another application: Suppose you want to look at member details that have weld symbols. You could output this report to see which members have weld symbol counts other than zero (0).
1 . Invoke Print Member Item Counts using any one of the following methods:
Prnt Mem
Itm Cnts
outputs a report 2 . A report is output to a warning window. You can optionally print the report (" Print ") or save it to a file (" Save ") or copy it (" Copy All "). Press the " OK " button to close the window.
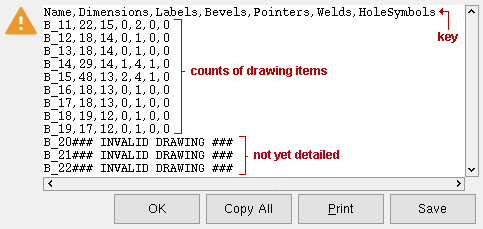
The key tells you the type of drawing item that is counted in a particular column. For example, dimensions are counted in the second column, labels are counted in the third column.
page 1 | contents | process > template detailing tools (drawing editor) | top
Print Submaterial Item Counts prints the counts of drawing items in all submaterial drawings, regardless of whether or not they were detailed using templates. Counts of dimensions, labels, bevel symbols, pointers and hole symbols will be reported. User-created as will of system-generated drawing items will be counted.
To use this tool, you must be in a drawing in the Drawing Editor . The type of drawing does not matter.
A possible application: Template developers might generate a report on submaterials generated without using templates and compare it to another report on the same job, after having re-detailed submaterial in that job using templates. The two reports could then be compared.
1 . Invoke Print Submaterial Item Counts using any one of the following methods:
Prnt Subm
Itm Cnts
outputs a report 2 . A report is output to a warning window. You can optionally print the report (" Print ") or save it to a file (" Save ") or copy it (" Copy All "). Press the " OK " button to close the window.

The key tells you the type of drawing item that is counted in a particular column. For example, dimensions are counted in the second column, labels are counted in the third column.
page 1 | contents | process > template detailing tools (drawing editor) | top
Current Template is a toolbar item that displays the name of the template file that you opened using " Load Template ."

The current template In this example is named " 000_beam ... " This icon can be found under the " Command group " called ' Process - Template Tools ' in Toolbar Configuration . If you are developing templates, you should place it on your toolbar.
It is useful to know your current template's name when you make changes to rules in that template using the Detailing Rules window. The Current Template toolbar item tells you what file will be saved when you Save Template or " Update " (on the Detailing Rules window). Template tools such as Display Rules or Convert to Rule can be used to make changes to the current template. Of course, the Current Template toolbar also provides useful feedback for when you Load Template .
page 1 | contents | process > template detailing tools (drawing editor) | top
|
page 1 | contents | process > template detailing tools (drawing editor) | top
|
page 1 | contents | process > template detailing tools (drawing editor) | top


